How to Configure Windows 10 Firewall Correctly

If you are a Windows user, this article is worth reading to save your system from bad people. Here bad people are spammers and hackers who manipulate you to install bad programs on your system. Windows Firewall is absolutely free for Windows users and provides a good sense of advanced security protection to your system if configures correctly.
Below are the advanced security features which you may not realize are provided by the Windows firewall.
- Obstruct unauthorized or blocked traffic
- Filter network traffic
- Filter host-based traffic
How can you open Windows Firewall?
1st Method
- Click on the Start menu
- Select Run
- Type wf.msc
- Enter

2nd Method
- Click on the Start menu
- Type cmd
- Right Click and Select Command Prompt in Run as Administrator mode
- type wf.msc

3rd method
- Click on the Start menu
- Type Windows Defender Firewall with Advanced Security
- Right Click and Run as Administrator mode
How to Configure Windows 10 Firewall Correctly?
(1) Prefer Default Configuration and not change settings without good reason
Under the Action tab, select Properties.
Domain Profile - for configuring the network if the system configures under the domain controller
Verify Firewall state to ON (recommended).
Other options must be selected similar to the below snapshot.

Private Profile - Useful in a private network (your home network)
Verify Firewall state to ON (recommended).
Other options must be selected similar to the below snapshot.

Public Profile - Useful in securing public networks like airports, hotels, etc.
Verify Firewall state to ON (recommended).
Other options must be selected similar to the below snapshot.

IPSec Settings
Options must be select similar to the below snapshot

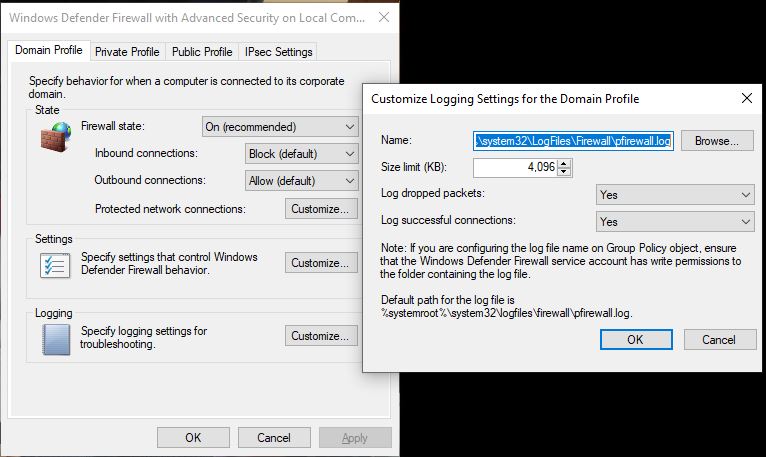
(2) Advanced Logging should be enabled
Click on Customize comes under the Logging section for Domain Profile, Private Profile, and Public Profile. And do changes as mentioned in below configuration snapshot.
- The default path for the log is already set. If you want to change it, ensure the firewall has proper permission for that folder.
- The default size limit is 4,096 KB. Old entries of logs will be deleted once the log file reaches 4,096 KB to write new log entries. However, you can increase or decrease the size of the file of logs based on requirements.
- Remember, either Log dropped packets or Log successful connections must be set to Yes to create a log entry on a log file. If no one set Yes, you have no entries of logs of dropped packets of incoming traffic, and the same for in case of a successful inbound connection.

(3) Ensure Microsoft Defender Firewall always ON
- Click on the Start menu
- Type Windows Security
- Select Firewall & Network Protection
- Select each Domain Network, Private Network, and Public Network one by one and Repeat Step 5.
- Select On under Microsoft Defender Firewall

(4) Disable Notification
This is optional and you may disable the display of Notification when the firewall blocked some programs because of configured policy. You can change the configuration by following below steps:
- Under the Action tab, select Properties
- Under Settings, click Customize
- Here, you can select No for display notification.

Conclusion
This article covers simple steps to configure Windows 10 Firewall correctly and securely. A firewall is the first line of defense for any system, it is advisable to follow the above steps and configure your system. Remember, do update your system regularly and secure the configuration of a firewall that reduces 95 percent of the problems of your system.
Subscribe us to receive more such articles updates in your email.
If you have any questions, feel free to ask in the comments section below. Nothing gives me greater joy than helping my readers!
Disclaimer: This tutorial is for educational purpose only. Individual is solely responsible for any illegal act.


