tshark: Basic Tutorial with Practical Examples

tshark is a command-line-based protocol analyzer tool used to capture and analyze network traffic from a live network. This can be used as a substitute for Wireshark if you enjoy working on a black screen.
This guide is for beginners who want to start analyzing protocols and use some basic commands of tshark. Here, I am listing some basic commands with example usage that help capture and analyze the network traffic.
tshark: Basic Tutorial with Practical Examples
Installation on Linux-based OS
You can install tshark just typing the below command for installation:
sudo apt-get install tshark
Click Here to know Linux find Command with 20 Examples
Usage of tshark command
1. All tshark commands displayed on your machine
If the user wants to see the different options available with tshark, just type the below command. Remember to use sudo while using tshark.
sudo tshark -h

2. Capture network traffic with tshark by providing an interface
Just type the interface name in from of -i option to display traffic dedicated to a specific interface. This option displays the clean output of a single interface.
sudo tshark -i <interface>

3. Capture network packets and copy them in file traffic-capture.pcap
By using -w options, the user can easily copy all output of tshark tool into a single file of format pcap.
tshark -i <interface> -w <file-name>.pcap

4. Read captured packets with tshark by providing input pcap file
By using option -r with tshark, the user can read saved pcap file easily.
tshark -r <file-name>.pcap

5. Capture packets and copy traffic into .pcap file for the particular duration
If user wants to capture network traffic from the live network for a specific period of time, just use -a option. The below command helps you to capture traffic for a particular duration.
tshark -i <interface> -a duration:<time>
Note: <time> is in seconds

6. Check the version of tshark
Just check the version of tshark tool by using the -v options
tshark -v

7. Capture the specific number of packets
tshark tool provides flexibility to the user to display the specific number of captured packets.
tshark -c <number> -i <interface>

Click Here to understand IoT Security
8. List out all the interfaces available to capture the network traffic
If you have a doubt about the number of available interfaces, use -D option.
tshark -D

9. Capture only packets from the specific source or destination IP
This is the most used command by security researchers and network engineers. If you want to filter traffic based on a specific IP, use -f option.
tshark -i <interface> -f "host <IP>"

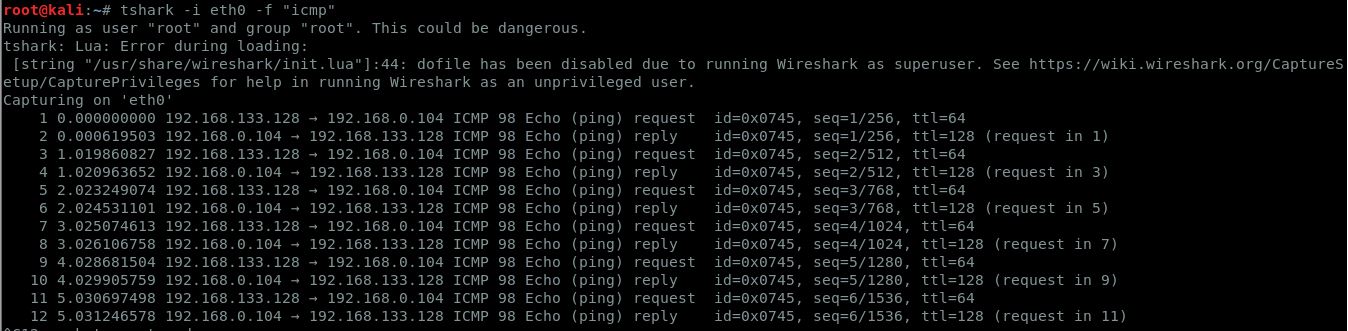
10. Capture only specific protocol network packets
The below example shows how you can filter specific protocols while displaying the results of the tool tshark.
tshark -i <interface> -f "<protocol>"
Note: <protocol> may be tcp, udp, dns etc.
Conclusion
This short tutorial equipped you to use tshark to analyze network traffic. You can use different options in the same command to filter results more specific to your interest. Further, if you are more interested in learning depth, Click Here to see the official manual of tshark.
Subscribe us to receive more such articles updates in your email.
If you have any questions, feel free to ask in the comments section below. Nothing gives me greater joy than helping my readers!
Disclaimer: This tutorial is for educational purpose only. Individual is solely responsible for any illegal act.


i need how to capture the packets counts of individual request form individual ip address uisng t shark… please share your knowledge
interesting